
This is the last part of the Azure Blockchain for Enterprise Blockchain Solution series. In the first two parts, we learned about consortium networks and smart contracts deployment on Azure Blockchain. In this part, we will particularly explore Azure Blockchain Our Workbench and its power to make Blockchain enterprise-friendly. As explained in the previous series, Azure Blockchain Our Workbench lubricates the development process of Blockchain applications by integration with various Azure services. It leverages the Blockchain by easing the process of sharing data and processes among organizations. Following are some major features of Azure Blockchain Our Workbench:
1. Identity Management
Azure Active Directory manages the identity of the members of the Blockchain network by mapping real and simple identities e.g emails with the complex addresses of Blockchain. Also, Azure Blockchain Our Workbench provides you with the flexibility to invite other members to the consortium network by simple invites on emails. Keys are managed and stored in Azure Key Vault that automatically encrypts transactions on behalf of the members without exposing the keys to Microsoft or any other third-party.
2. User Roles Management
The administrator can manage the roles of members in a consortium network who possess the permission to create smart contracts in the network.
3. Off-Chain Storage
Provides the flexibility to stores the on-chain data off-chain as well in relational databases for data analysis
4. API Management
It provides easy integration with other applications by enabling the use of APIs for accessing Blockchain services.
As now you have got a basic understanding of what Azure Blockchain Our Workbench is, let’s get straight into the fun part and deploy Our Workbench in your Azure Portal to explore things in action.
Deploy Azure Blockchain Our Workbench:
In your Azure Portal navigate to create a resource → Blockchain → Azure Blockchain Our Workbench.
Basics:
- Choose a unique identifier for your deployment in Resource prefix.
- Now, choose your VM username.
- Choose the Authentication type as a password and set your password for connecting to VM.
- Set a password for accessing the database that is created as part of the deployment.
- Choose your deployment region, subscription, resource group and location accordingly.
Sample Deployment:
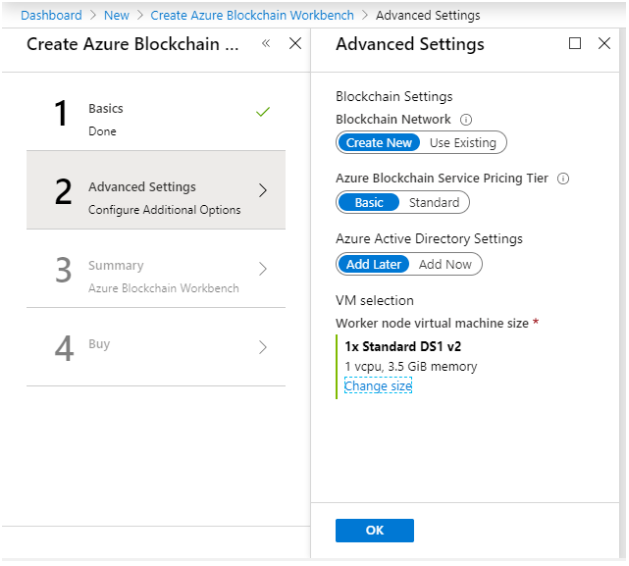
Advanced Settings:
- Choose the option of creating a new Blockchain network. It will set up a network of PoA Ethereum nodes managed by a single subscriber. If you want to use an existing Ethereum proof-of-authority network, you need to add the RPC endpoint URL here.
- Choose Azure Blockchain Service Pricing Tier.
- We are going to set up Azure Active Directory settings later, so choose the Add later option.
- Choose DS1 v2 for VM as we are doing it for learning purposes
Sample Deployment:
View the summary and complete your deployment. Your deployment may take up to 90 minutes.
Post Deployment:
After your deployment is completed, navigate to the resource groups and choose the resource group in which you have deployed the Azure Blockchain Our Workbench. In the OverView tab, under the Type Filter column, only check the ‘App Service’. There are two deployments in total with type App Service. Choose the one that is without API.

In its OverView tab in the top right corner, you’ll find the URL for your Azure Blockchain Our Workbench. Copy it and paste it in the browser.

After that, you’ll be headed to a welcome page of Our Workbench asking you to do some additional setups. These steps are important to set up the Azure Active Directory as we had chosen the ‘Add Later’ option during the Azure Blockchain Our Workbench deployment.
Azure Active Directory Tenant Setup:
Azure Active Directory basically allows you to manage users and roles associated with your resources in Azure. Here we need to give users access to create applications in Azure Blockchain Our Workbench. So let’s see how we can do that.
Step 1: Launch Cloud Shell
Copy the URL you find in the dashboard of Azure Blockchain Our Workbench and choose the option of Launching Cloud Shell.
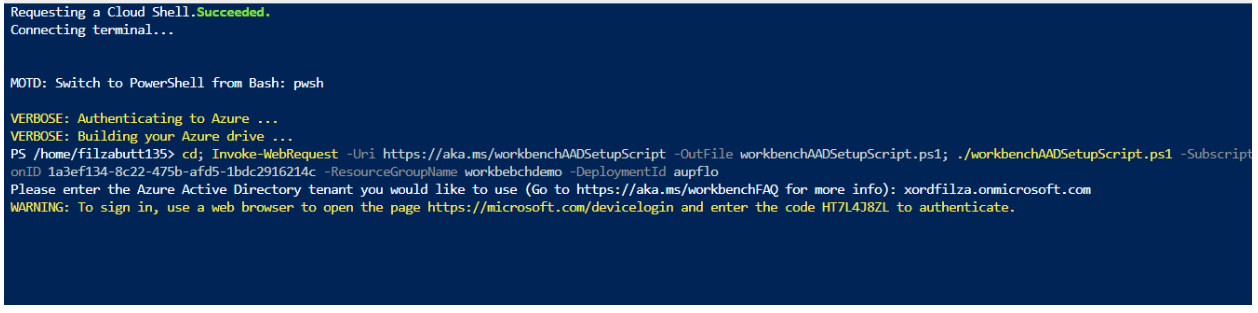
Step 2: Create an Azure Active Directory Tenant
After launching the Cloud Shell, choose your Azure account and then choose the option of PowerShell from PowerShell and bash. This will open a Powershell Command Prompt for you. In this command prompt, paste the URL you copied from your Azure Blockchain Our Workbench dashboard. After entering the URL, it will ask you to enter the link of the Azure Active Directory Tenant. Now to create Azure Active Directory Tenant in Azure follow the following steps:
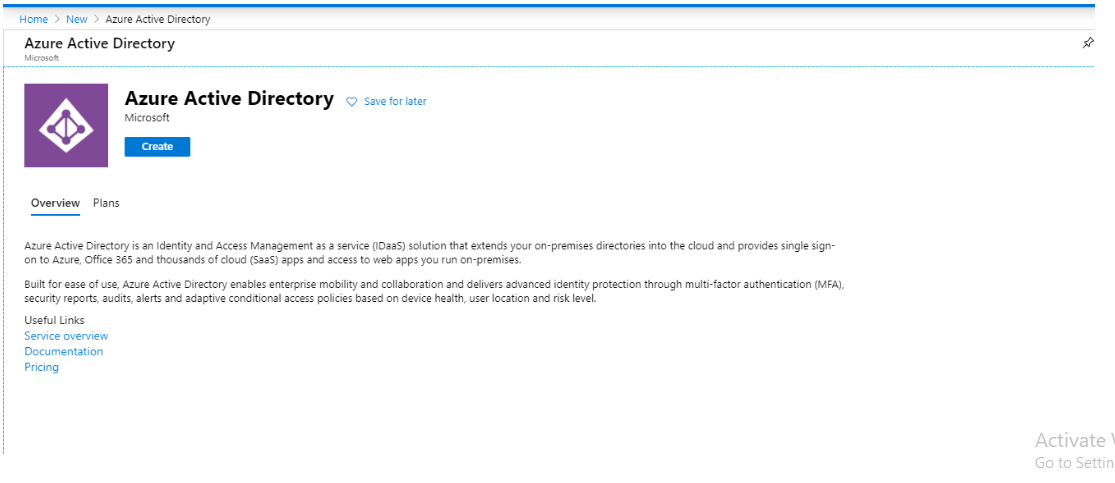
- In your Azure Portal Dashboard Menu, click on the created resource and in the marketplace search for Azure Active Directory.

- Once you find the Azure Active Directory, click on it and you will get a creative option. Click on the Create button.
- After that, you will see a form to add Organization name, Domain name, and Country. Add the details like follows:

- After that click on Create to create the directory. It will take a minute to be completed.
- Once the Active Directory is created, copy the initial domain name that you have entered, that in my case is ‘xordfilza.onmicrosoft.com’, and paste this domain name in the opened window of Cloud Shell where it was asking to enter the Azure Active Directory Tenant.
Step 3: Enter The Code
Navigate to the output URL and paste the code that is output on the PowerShell window after entering your Azure Active Directory Tenant Name.
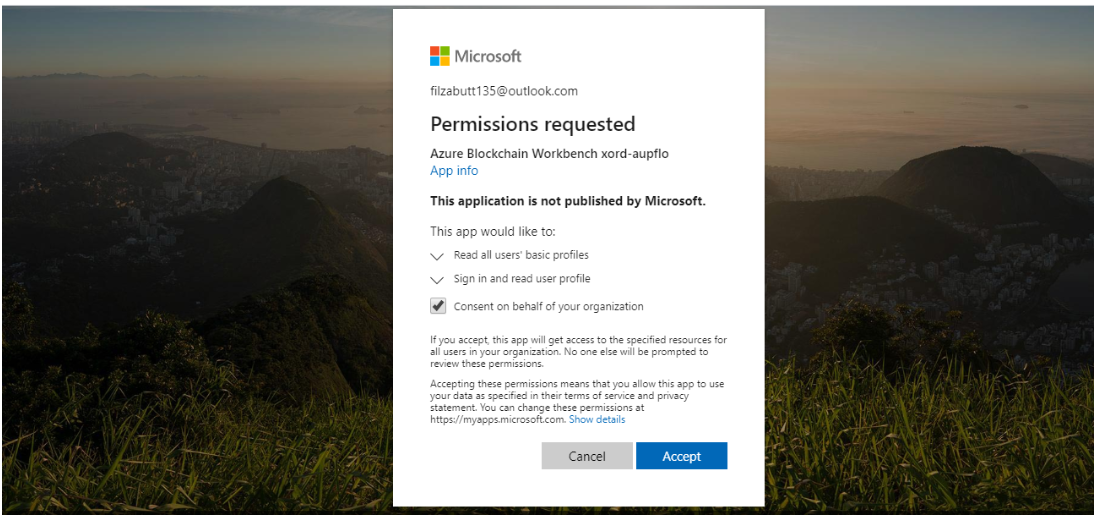
Step 4: Grant Permission
After entering the code, you’ll see the success message in your PowerShell after several messages. Now refresh your Azure Blockchain Our Workbench URL, you’ll be asked to grant permissions. Check the box of ‘’consent on behalf of your organization’’ here.
After that, your Azure Blockchain Our Workbench will be refreshed and you can use it to create new applications in the Our Workbench. You can also add a user to your Our Workbench and giving them access to create and interact with your application.
To add users go to Azure Active Directory → App Registrations.
Here you will find your Blockchain Our Workbench application. Click on that and go to the link under “Managed application in local directory”
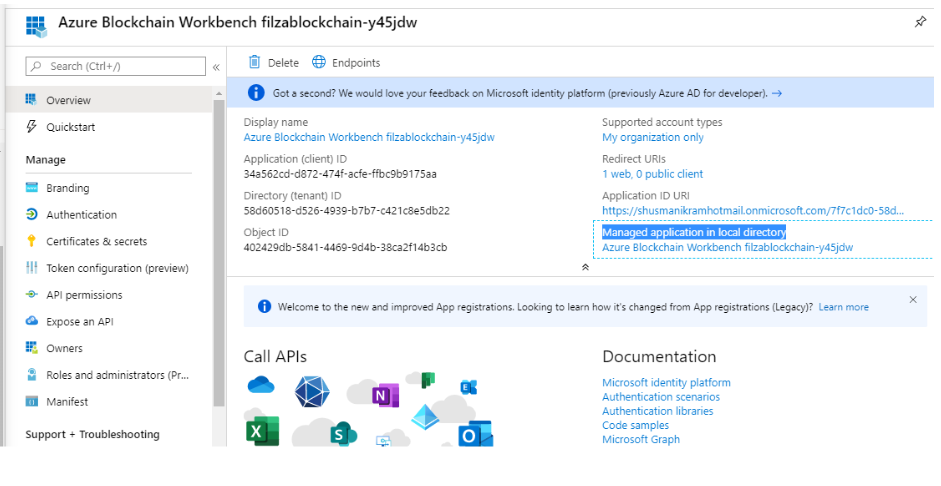
Clicking on that link will take you to the dashboard where you can assign users and groups and manage them accordingly.
Conclusion:
That’s all for the final part of this series for building enterprise Blockchain solutions. The goal of the series was to give the readers an idea and overview of the different notable Blockchain services in Azure and the basics of their deployment. There is yet too much to explore individually in each of these services so you could choose the best service fit depending upon your enterprise needs.
Check out the whole series on Azure Blockchain for Enterprise Blockchain Solutions here: https://wordpress-548015-1942492.cloudwaysapps.com/publications/deep-dive-into-azure-blockchain-for-enterprise-blockchain-solutions-part-1/ or contact Xord @https://https://wordpress-548015-1942492.cloudwaysapps.com/contact/ for Blockchain projects and free consultation.


